Bokena Series pt 2 Blog 6: WAH SIBEI SIAN EH NOT EAZY YOU KNOW
Welcome back my beloved readers to another BOKENA SERIES, Today we will talk about my end project for the module Chemical Product Design and Development and this will be my final blog for the semester
Our team Chemical Device
What it is. What problems will the chemical device solve?
It is a breathanalyser that is permanently fixated in a car. The breathanalsyer is a must to every car to prevent any kind of drunk driving. The driver must test before he/she can even start the car, if the alcohol level is too high the car will not turn on and their emergency contact will be called to pick them up. This is to ensue that there is no intoxicated driver on the road preventing and sort of accidents related to drunk driving in efforts to reduce road accidents.

A hand drawn sketch of our breathanalsyer by our beloved CEO Sreenithi
Team Planning, allocation, and execution
Role Allocation
Chief Executive Officer (CEO) - Sreenithi
Chief Financial Officer (CFO) - Me
Chief Operations Officer (COO) - Jun Yi
Chief Safety Officer (CSO) - Eng Kiat & Matthias
Bill of Materials

Bill of material for our breath analyser
Gantt Chart
Task Allocation
CADD (Fusion 360) & Laser Cutting - Sreenithi & Eng Kiat
Arduino Programming - Jun Yi & Abhishek
3D Printing - Matthias
Product Assembly - All members
Design and Build Process
Part 1. Design and Build of Reusable Mouthpiece and Laser Cutting (done by Sreenithi)
Link to Sreenithi's blog : SENTHILU
Part 2. Design and Build of Breathanalyser casing and Laser Cutting (done by Eng Kist & Matthias)
Link to Eng Kiat's blog: Eng Kiat
Link to Matthias's blog: Matthias
Part 3. Design of Arduino programming of the Breathanalyser (done by me).
Hero shot for task 3.
For my section, Jun yi and I did the coding for the breathanalyser, which consisted of 4 components.
- Alcohol Sensor
- Temperature Sensor
- LCD Screen
- 360 Continuous servo
We had used 2 different boards via serial connection without knowing that all the components could be connected into one Arduino UnoMaker. Leading us to separate the components into 2 parts.
- First board - Consisting of the Alcohol Sensor & Servo
- Second Board - Consisting of Temperature Sensor & LCD
First Board

- We use rxPin and txPin to define as Pin 2 and 3 respectively to the board for the serial connection between 2 boards.
- Next we set Alcohol sensor as an analog pin as A0

- Next we set the 360 Continuous Servo to Pin 9
- Then we set the Servo at the initial point (90 Degrees)
- Starting Serial connecton between 2 boards

- Causes the Alcohol Level Sensed by the sensor to read as 'alcoholLevel'
- Sends value from Alcohol Sensor to the second arduino board to display on LCD Screen
- Sets the servo to turn when alcohol level is more than 735
- When alcohol level below 735, servo will stop moving
Second Board

- Includes Library for Temperature Sensor & LCD
- Serial connection from Second Board to First Board
- Links rxPin and txPin as Pin 2 and 3 respectively for serial connection
- Setup a onewire instance to communicate with any onewire device
- Links onewire reference to DallasTemperature library

- Causes LCD Screen to display readings from Alcohol Sensor and Temperature Sensor.

- Collects data from first board to read alcohol & temperature level
- Then displays alcohol and temperature level on LCD Screen
Hero Shot of me

Part 4. Programming of Arduino Programming with me. Link it to Black widow’s blog
Link to Jun Yi's blog: Jun Yi
Part 5. Integration of all parts and electronics (done by all members)
 |
| Casing glued together and with the hinges attached |
 |
| Our CEO glueing the mouthpiece together to the casing |
 |
| Inner components like Alcohol sensor and Temperature Sensor |
 |
| Constructing of the pulley |
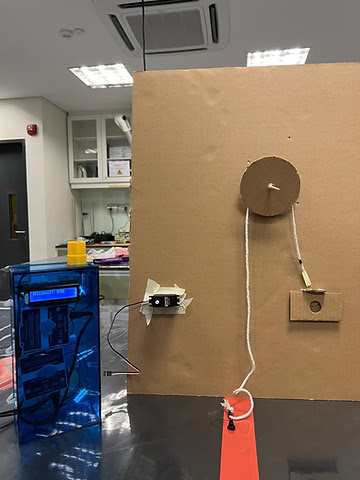 |
| Final product after assembly and addition of pulley system |
Hero shot


Problem 1 - Temperature on LCD kept displaying -127°C
- This is because he had forgotten to include the DallasTemperature library into the coding preventing the sensor from detecting the temperature. Once when had added the library, we were able to get readings of the surrounding temperature
- Problem 2 - Alcohol level did not change despite there being alcohol present
- We had to change the int alcoholLevel = AnalogRead() to int alcoholLevel = mySerial.parsenlnt(). Once we had changed this there was alcohol level signal was read from the 1st board instead of the second. With the previous code the board was trying to read the alcohol level from the 2nd board but there was no sensor even connected to the board.
- Problem 3 - We wanted to seal the casing with acrylic glue and close it off completely
- The issue we noticed with this solution was that there will be no way to adjust the wiring and the inner components if something were to go wrong. Therefore, we wanted to keep the back piece open by adding hinges. A simple method we took was to laser cut holes in the back plate and side plate to add zip ties that allow us to connect both the side piece and the back piece to act as a door to open the breathanalyser if any adjustment was needed.
- Problem 4 - the initial mouthpiece that we had 3D printed was very large for the casing itself and did not fit well.
- We had to redesign our mouthpiece with smaller dimensions to make it smaller for the user to place their mouth on it and for it to fit better onto the case.
- Problem 5 - The inner components were very difficult to assemble as there were too many wires occupying space
- We had to enlarge the size of our casing to allow all the wiring to fit into the casing without budging out. This also helped to easily see which wires were connected to which components and had simplified our process of replacing the wiring as we could see clearly where the issues was. It also prevented us from pushing the wires in and damaging the connections so that we could keep our product in one piece
Project Design Files as downloadable files
Below is my Learning Reflection on the overall Project Development.
As me and Jun Yi had taken up the role of doing the arduino coding, we thought the process would be simpler. However, we had misgauged the fact that in a code anything and everything can go wrong. This lead to many different occasions where the servo would not move and how even though there is no alcohol the servo would move. To tackle these issues we actually used an AI called ChatGPT which looked through our code and actually told us what was wrong with it and how we could improve it.
We also had many difficulties as we were to connect 4 different components to the boards which took a lot of effort to research. This lead to us staying up at night on the call watching youtube videos on how the components worked and how they can be adjusted. Like for example the contrast on the LCD can actually be changed using the screw at the back, which we had no clue until very late into the coding. There were also instances were we would give up but the fact that the other group members were working on their part made us feel more dedicated and motivated to complete it.
The best part of this assignment was the fact that when we finished the code and the small steps that we took actually worked, there was a sense of elatedness and accomplishment where me and Jun Yi would shout in joy calling each other geniuses. There were also many occasions where we would go out to study for the test but ended up spending 4 - 5 hours looking on the code as we were reminded that the deadline was coming up
Our product was intended to be placed in every car in not only Singapore but the whole world. And to apply the mechanism we had thought placing a cover over the keyhole. However, adding the servo to make the wheel turn for the keyhole to be covered was one of the hardest parts as we had to properly think the angles that we had and the distance that the servo would have to turn to place the cover on the keyhole.
All in all this was an interesting experience for me and the team as we are a lazy bunch but with one person our BELOVED CEO SREENITHI always there to remind us to do work, got up and completed what was expected of us.
Thank you for reading my blogs and joining me in my learning process throughout this module, I hope you had fun reading and goodbye
Yours Sincerely,
Dr Bokena


Comments
Post a Comment